
A few days ago DxO came out with their flagship RAW converter product DxO Optics Pro in its all new and shiny version 9. Five years ago, back in 2008, I have already evaluated and then bought DxO Optics Pro 5.3, but later I lost interest in the program. Photoshop was faster, offered me much more flexibility, and using plugins like Noise Ninja or Topaz DeNoise, I could get comparably good noise reduction.
I looked into it later with version 7, but at that time I used the Panasonic LX5, and although that camera was supported, DxO did a mediocre job on its files.
With version 9 DxO has introduced a new, improved noise reduction mode called PRIME, and that’s the reason why I got interested again. Can DxO Optics Pro 9 possibly give me an extra stop in low light?
Actually for me the interest is rather academic. So far I have set my Olympus OM-D E-M5 to go no higher than ISO 1600 in Auto-ISO mode, and along with the excellent image stabilization and my preference for static subjects this has sufficed all the time. In fact most of my images are made at base ISO, and only a few go higher than ISO 800.
Currently I use Lightroom’s built-in noise reduction capabilities. Lightroom is not quite as good as Topaz DeNoise, but as long as I don’t go higher than ISO 1600, I see no difference. Apart from that, Lightroom behaves very predictably. If you fiddle with the sliders in Topaz DeNoise, you get a slightly better result if you do the right thing, but if you don’t, it can be easily worse.
As I remember DxO, it could also be customized in many ways, but the analysis that determined the parameters in auto-mode was normally sufficient to produce a good result. If at all, DxO smudged away a little too much detail for my taste.
What I also remember is, that DxO was slow. It just didn’t feel like a program that I wanted to use all the time. This is another point that needs revisiting with DxO Optics Pro 9.
The Windows installer is a big download with 317 megabytes. It comes complete with the .NET runtime 4.5, and the package seemingly contains both 32 bit and 64 bit versions. The actual correction modules for supported lens/body combinations are not contained, they are downloaded as needed.
Well, my first impression when starting the program was, that it is even slower than I remember. It may be that I am spoiled by Lightroom’s fast operation, but fact is, that DxO is maddeningly slow. It is slow to start up, and once you “develop” an image with PRIME noise reduction enabled (and that’s the one thing that I am after), it begins to remind you of early home computers. I’ve tested on two dual core computers, my laptop with 2.4 GHz, and a somewhat aging desktop with 3.2 GHz, both running an up-to-date Windows 7 64bit on 8 GB memory. On both computers it took between 10 and 15 minutes to render a single image.
Insane? Well, depends on what you want and how you look at it. DxO tells us that the PRIME algorithm looks at about 1000 pixels in the neighborhood of each pixel rendered. Clearly this explains the times, and we will see, that the results are indeed very good. How good? Well, I’d say DxO delivers the best noise reduction performance that I’ve ever seen. If you care to look at pixel level, it is clearly better than everything else, and it delivers that stunning performance even while running in full automatic mode.
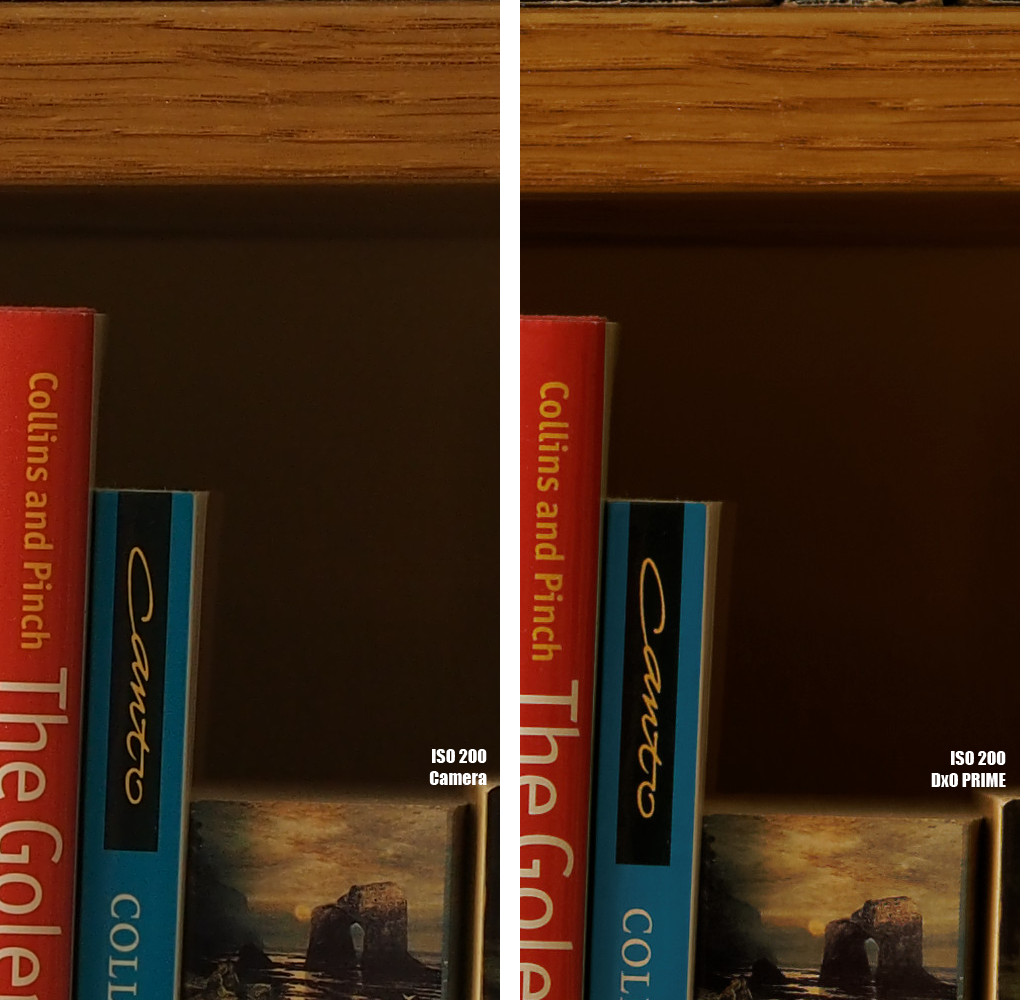
I guess it’s time now for some examples. Let’s begin with an ISO progression. The images were taken at daytime in an indirectly lit room. I’ve used the OM-D E-M5 with Olympus 45/1.8 at f8, the camera mounted on a tripod, release delayed by 2 seconds. In order from top to bottom the ISOs are 200, 1600, 3200, 6400, 12800 and 25600. Each image has a crop from the original out-of-camera JPEG on the left and the DxO version on the right. You can click on the images to open them in full size.
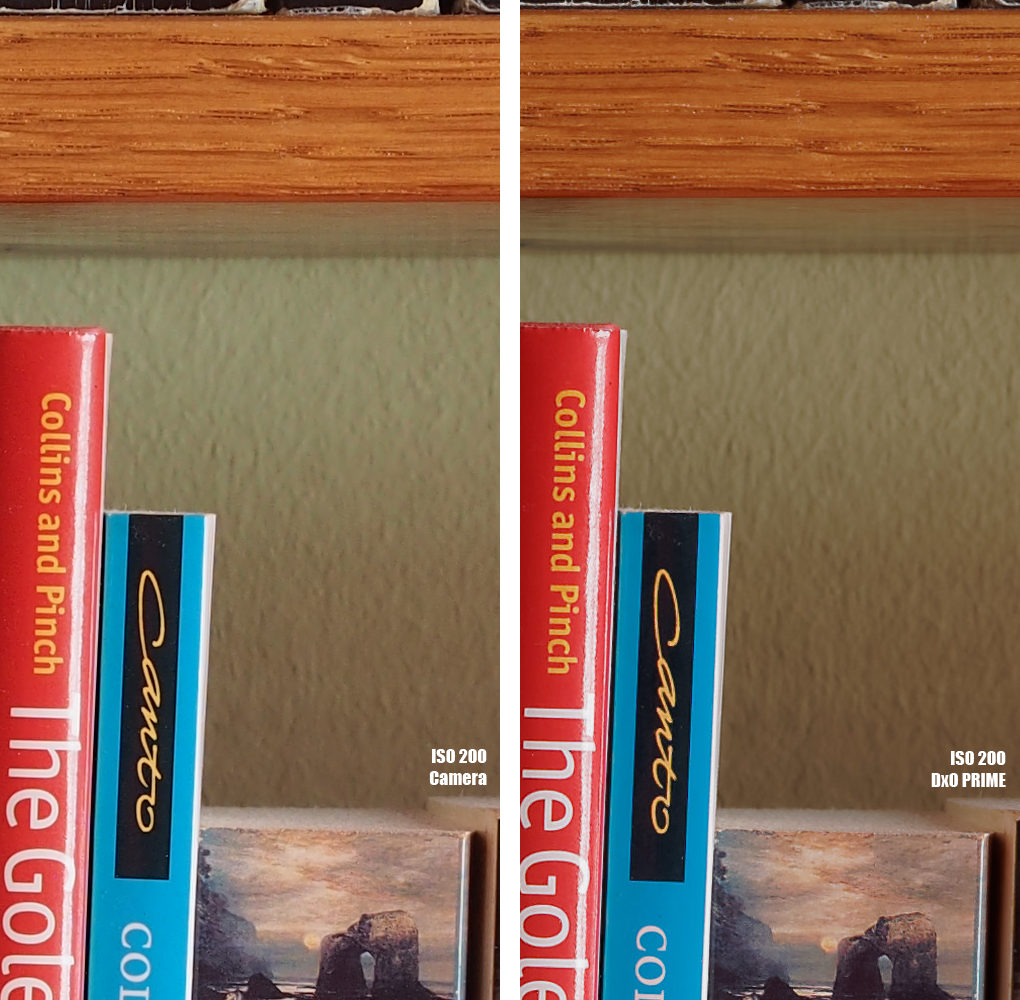

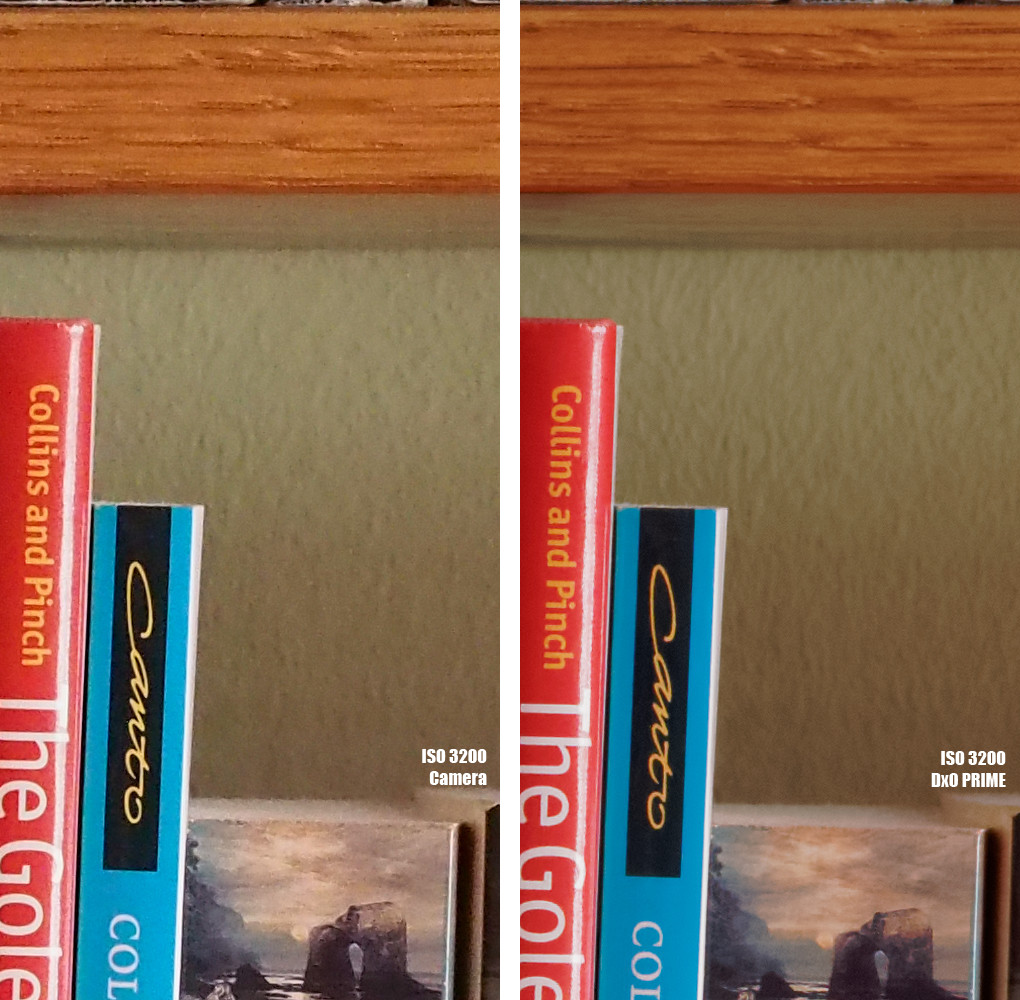
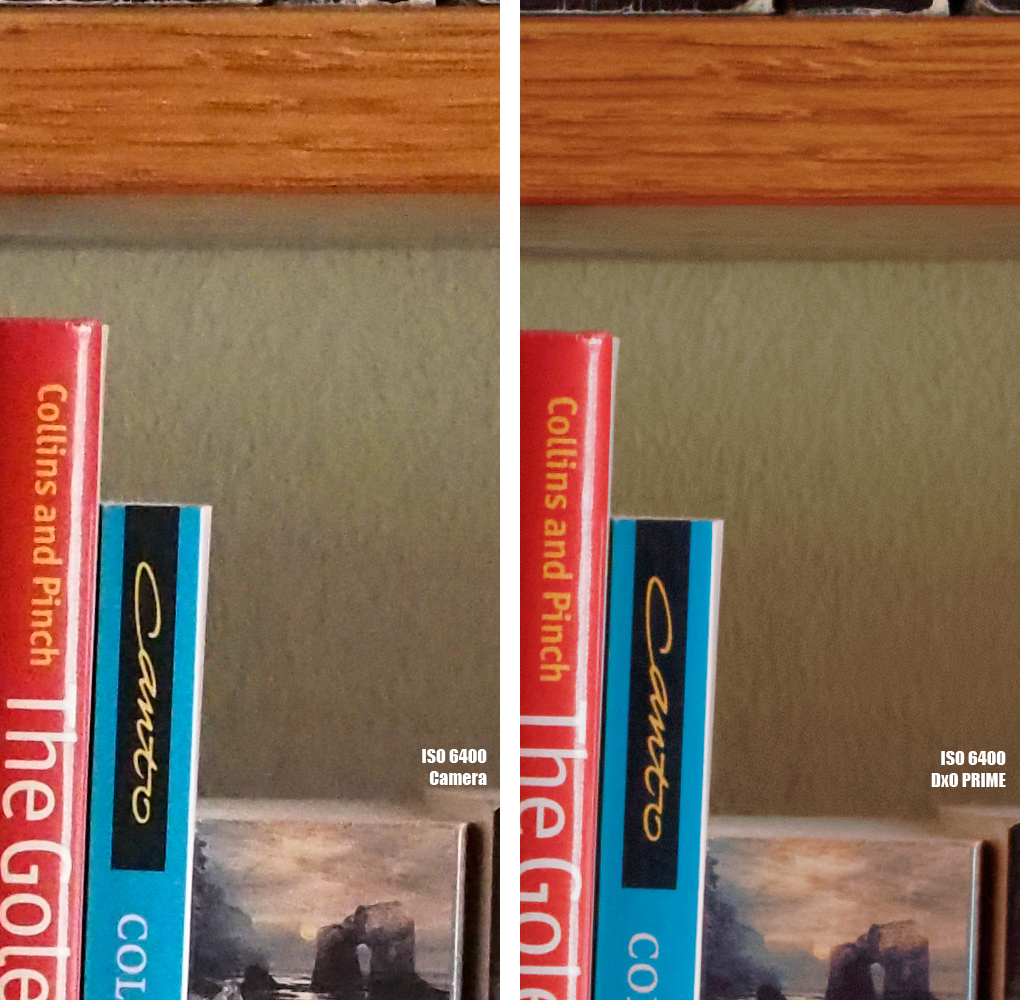

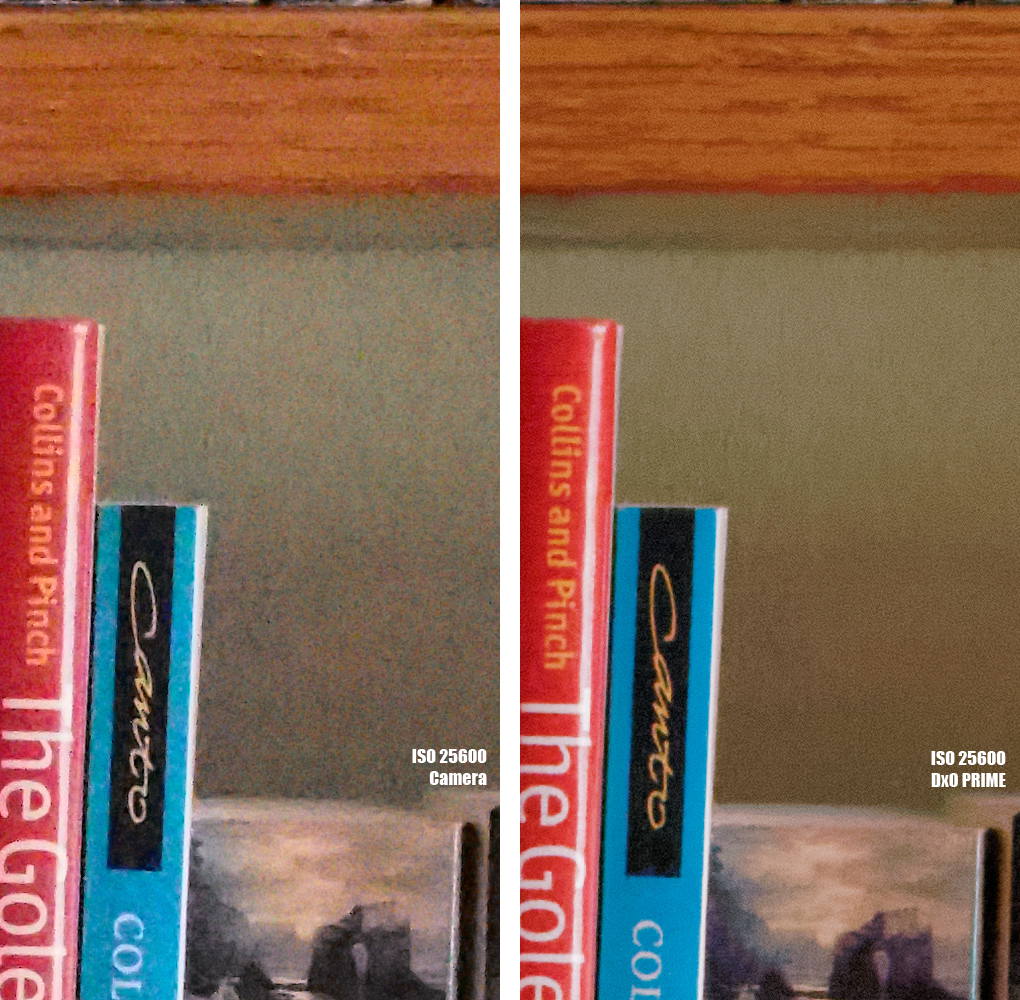
There is clearly a an advantage for DxO above ISO 1600. Even at ISO 3200 the original JPEG begins to get fuzzy, and from there on it only gets worse. Low frequency color noise turns up, and from ISO 6400 up the colors get more and more washed out.
Both versions lose fine details, but DxO delivers smooth images without color noise. The detail retained seems pretty near the maximum possible and DxO holds colors pretty well.
This is not what I use high ISOs for though. Let’s look at the same progression, but this time it’s dim, artificial light, in other words, the typical light that forces you to use high ISOs.
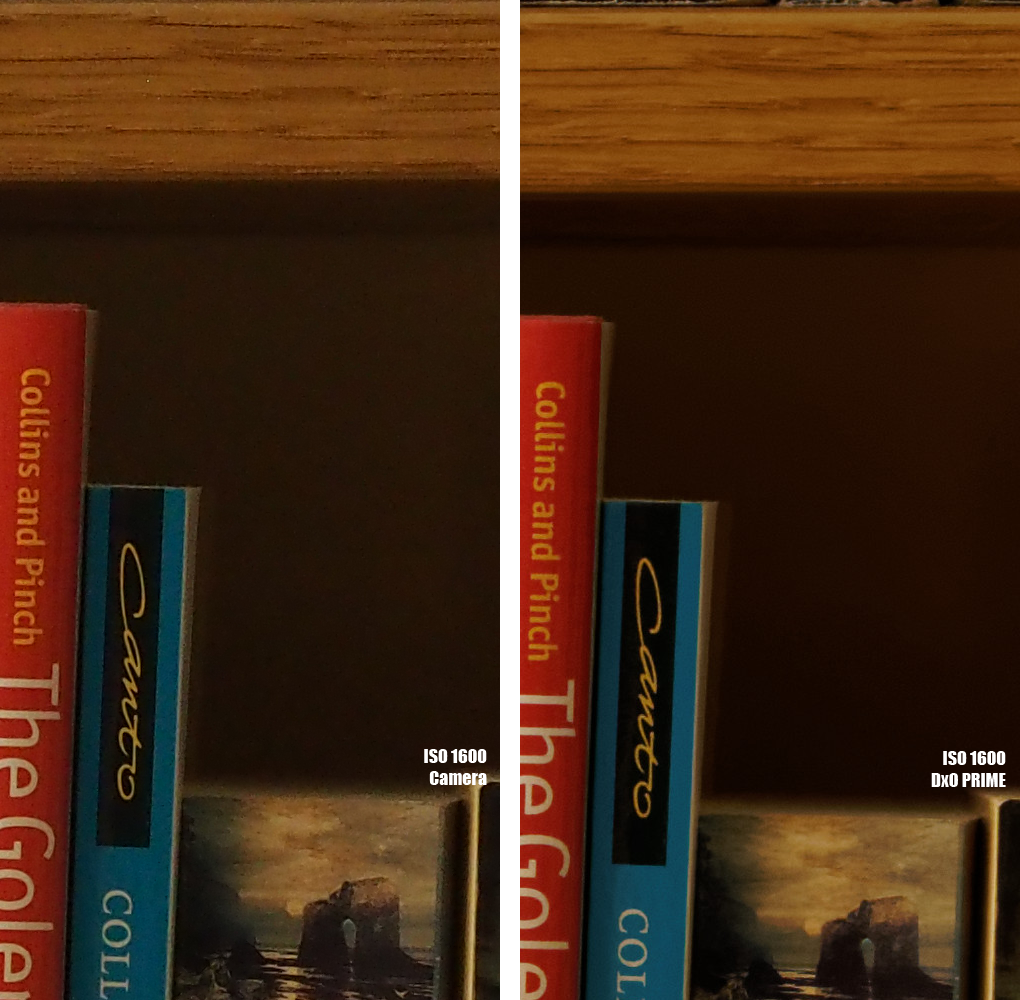


Now it gets clearer, doesn’t it? You can see an obvious advantage even at ISO 1600, and the difference in luminance noise, color noise and purity of colors is stunning once we get to ISO 12800. I would still consider ISO 25600 unusable for my purposes, but the DxO version of ISO 12800 is actually pretty good.
Care for one more progression? Here is an outside scene at night:
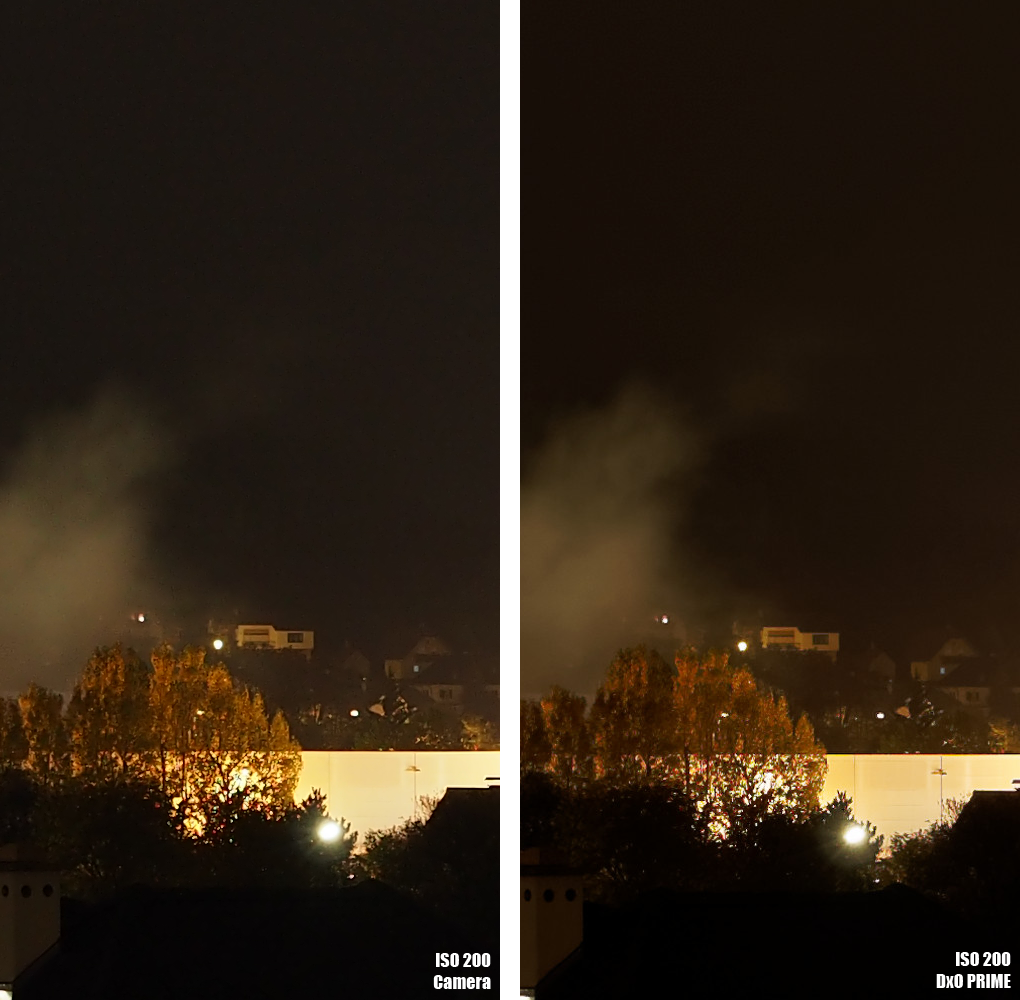


This is pretty much the worst case for photography: most of the image is almost black, the few lights of some remote houses are extremely bright. There is dimly lit foliage on some remote trees.
We can see that DxO eliminates dead pixels. That’s fine but expected of a RAW converter. Again we see better colors in the DxO version. Better, you ask? Well, they match what we got at base ISO, thus DxO must be right, right?
You can compare the images in detail and in full size from a Flickr set that I’ve created.
Especially when you look at high ISO night images, you can see that the high ISO camera JPEGs show some banding in the darkest spots. Just look at the sky in the ISO 25600 night shot. Now look at the same image developed with DxO. Quite a difference.
 Now let’s look at a part of the ISO 200 night image in Lightroom. I’ve applied a steep curve to extremely lighten up the shadows. Color noise reduction is on Lightroom’s default, sharpening and luminance noise reduction are turned down to zero. As to be expected: there is noise in the shadows, and if you look at the roof, there is horizontal banding as well. Of course you can’t see that in a normally exposed image. It’s just what you get when you abuse a digital image sensor.
 Finally let’s have a look at a screenshot from Photoshop. You see the two ISO 25600 versions above, left the camera JPEG, and below the two ISO 200 versions, again left the camera JPEG. To all four images I have applied the same extreme curve.
Immediately you see that DxO has set a much more definite black point. This black point is retained even at extreme ISOs. At base ISO the camera JPEG shows a mottled pattern of magenta/green in the shadows. There are also sharpening artifacts. Not so with DxO.
To come to a verdict is not so easy.
DxO Optics Pro delivers very good image quality. It’s noise reduction is definitely the best that I’ve seen so far. If you frequently shoot at high ISOs and want to retain every bit of detail while keeping colors natural, DxO is the best tool on the market. It will be most interesting for people who shoot action or use long lenses in low light.
As an all-purpose RAW converter DxO fails miserably, at least for me. It is just too slow in general operation, even without PRIME noise reduction, and once you apply PRIME, it is impossible to use it for more than a few select images.
Thus: used as a special noise reduction tool, DxO Optics Pro 9 earns my recommendation. Whether you need such a tool is up to you.
The Song of the Day is “Truth Doesn’t Make A Noise” by The White Stripes. Hear it on YouTube.
April (2013-11-08)
Though I have Noise Ninja and Topaz DeNoise, DxO 7 has been my go-to converter for noise reduction. Until I purchase a new camera with capability for higher ISOs, I wasn't going to jump on the upgrade. Now, I'm definitely going to give DxO 9 a trial run. Thanks for the work you put into this post!
💬 Reply 💬